


9 Hazardous Substances Symbols - toxic hazard sign
Knight RiderLEDlightscannerBarRed
Once the circuit is soldered, it’s a little bit harder to make changes if you messed something up. (But not too hard though, you can always desolder).
The base of each whip features a standard 3⁄8 - 24 mounting stud for installation on mobile or fixed antenna mounts like MFJs lip mounts, magnet mounts, tripods and dipole mounts. See page 63 for more MFJ mounts.
Make sure you get this to work before you move on to the next step. Also, make sure you remove the LED and the resistor before you continue.
Knight rider kitt light barprice
Start by connecting the oscillator part. Connect it at the top of your breadboard so that you’ll have lots of space to connect the rest of the circuit below.
This gadget lets you use any IR remote-control to control your lamp, garden lights, heater oven, garage door, or anything else.
There are only 6 LEDs, but 10 counter outputs. Each of the LEDs on the two sides connect to output 0 and output 9 as shown in the Knight Rider circuit diagram above.
Knight Rider lightfor truck
It’s a really fun circuit to build. I once built a larger version of this for the inside of a party bus I was a part of. Unfortunately, I broke it the first day because I increased the voltage too much, but that’s another story.
The Knight Rider light bar circuit creates a running light similar to the light bar on the car from the television show Knight Rider.

They can also be used to replace your current automatic screwdriver whip for a more highly efficient fixed mobile operation.
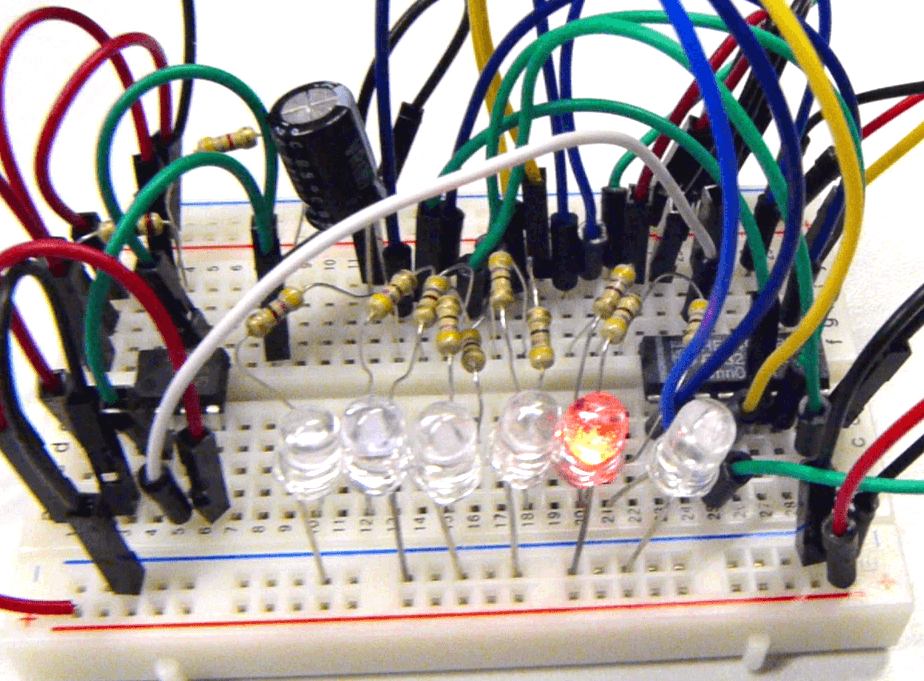
Then test the 555 timer oscillator by connecting an LED in series with a resistor on the output. With the values chosen above, your LED should blink about 3 times per second.
Knight Riderlights for car
Knight Rider light Baroriginal
From Help Tickets to Warranty Information We've Got You Covered!!! Customer Support Create A Support Ticket Contact Us MFJ Employment Opportunities MFJ Warranty Information Additional Info US Dealers International Dealers The Story of MFJ
You can build this circuit if you’re a total beginner, but of course, it’s a bit easier if you have already built a few circuits before.
Electronics is easy when you know what to focus on and what to ignore. Learn what "the basics" really is and how to learn it fast.
Knight RiderLEDlight bar
The counter sets one of its 10 outputs high depending on where in the counting sequence it is. So if it’s at 0, output 0 will be high. If it’s at 5, output 5 will be high. And if we have an LED connected to the output, the LED will light up.
I usually like to build the circuit on a breadboard first. Just to make sure I understand it and am able to build it before soldering it onto a prototyping board.
If you followed my steps above, you know that your oscillator circuit is working. So something must be wrong with the counter circuit or in the connection from the oscillator to the counter. Start by checking that the connection between them is correct.
Knight Rider light barillegal
Rigidly collared at the base, stronger than plated brass, and impervious to rust and corrosion, they stand up to the forces of nature and the rigors of portable operation where others might fail.
This is the part that creates the pulses for the counter input. The speed of the oscillator (i.e. how many pulses it has per second) determines how fast the light will run back and forth.
If no LEDs are lighting up, there’s a big chance that you’ve connected your LEDs in the wrong direction or that you are using the wrong value for the resistors. Check the direction of your LEDs and check that the resistors are 100 Ohm.
Now that you know your oscillator is working, you can connect the remaining parts. Connect it as shown in the Knight Rider light bar circuit diagram shown above.
Knight Riderscannerlightwith sound

Only one LED should light up at a time. If more LEDs light up at the same time, you must have a faulty connection from the outputs of the counter to the LEDs. Inspect the ones that light up at the same time carefully to find the error.
MFJs premium stainless steel telescopic whips are the perfect choice for building collapsible multi-band dipoles, mobiles, portable and base antennas. They are great for traveling, mini DXpeditions, vacations, etc.
This gadget lets you use any IR remote-control to control your lamp, garden lights, heater oven, garage door, or anything else.


 13322766566