


Portable Containment Bund - portable bund
Roundabouts aren't the rotaries of the past. Rotaries are often much larger, sometimes using traffic signals or stop signs, with vehicles traveling at higher speeds. Roundabouts are smaller, and have a sharper angle of entry, which reduces speeds and increases safety. Here's a quick breakdown on the differences between the two:
Our fixed RA1 and R2 grade reflective aluminium signs are all CE marked and are manufactured to the highest possible standards.
WINDING ROAD SYMBOL Class 2 reflective for maximum visibility.Constructed from durable 1.6mm thick aluminium.
These types of intersections generally are less expensive to operate in the long term as compared with conventional intersections, since they don't require traffic signals. This means no maintenance or electricity costs; an average savings of about $5,000 per year, per intersection.
Well that's it. You should be getting a whole lot of light coming at you. Stick it outside and enjoy. You now have a great lighting system that looks classy and will provide a lot of light.
I bought all the electronics off of eBay on the cheap. The hardware parts I bought from a local hardware store. The total cost of this project was in the range of $75 - 100. Not overly expensive, but much cheaper than any store bought high powered solar lighting system. Plus a whole lot more powerful. I also bought a more expensive driver than I needed in case I wanted extra functions, you could easly shave $10 off the project by getting a cheaper one.
The majority of your time will be spent trying to figure out how to run wires into and out of things. The amount of real "making" work is rather small.
Remove the Positive wires of both the solar panel and the LED driver from the Charge Controller. (We're completely getting rid of the positive wire going between the Controller and the Driver and replacing it with this circuit.)
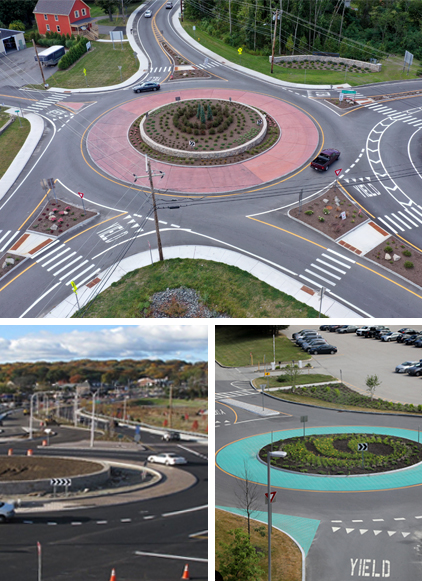
The apron is often made of decorative materials such as stamped croncrete or pavers, improving the appearance of the roundabout.
Roundabouts have proven to reduce fatalities by 90 percent, and greatly reduce injuries and the severity of crashes. With their lower speeds, these intersections are safer for pedestrians, cyclists, older drivers and novice drivers.
Parts: Cheap Lighting System (With 2 or more metal "heads") Heavy Duty Outdoors Wire High Powered LEDs (1 Watt or 3 Watt depending on your needs) High Powered LED Driver Heat Sinks 18V or better Solar Panel12V Solar Charge Controller 12V Battery Wire Plastic Container Washers Cable Clamp Terminal Strip
After I soldered the LED I also put a heat sink on the bottom of the LED. These guys can get hot, and since we're in a mostly enclosed space I don't want to take any risks.
if you didn't catch what we're doing, we're hooking things up in a Series. Positive to Negative, Positive to Negative. If we wanted to we could add more LEDs into the mix doing the same pattern. My driver can do 10 watts, which means if I provide a 24V power input I could easily control ten 1 Watt LEDs. Though I'm just going to do 2 or 3 of my 3 Watt LEDs.
Quntis Solar Driveway Lights are powered by monocrystalline silicon solar panels and high-capacity battery. The fast charging speed and longer lighting time
The key is finding a strong enough transistor. A standard 2N3904 will NOT work. You'll nee something that can handle higher voltages and a higher current. As my solar panel is 21V at 0.6amp I'm using a transistor with a bigger kick.
While I love making proof of concept solar projects, or solar projects that I might use if the world comes to an end, I prefer to make solar projects that are useful in my day to day life. (I love my solar FM radio, but I've never had the need to use it in an emergency situation) This past summer my father had been complaining about installing a lighting system for the back of his yard. The big issue being that he hates running wire 100 yards just to get three lights to turn on at night. Plus, being the over achiever that he is, he decided to bury the wires so that he wouldn't run over them with the lawn mower. This is when I stepped in. I decided to make a high powered solar lighting system so no wires would ever need to be run to the back of the yard. Ever. Oh, and I'm not talking about a few little wussy LEDs inside of a jar, I'm talking some high powered 3 watt LEDs inside real metal lighting enclosures. Ones that will probably attract every moth for ten miles. (And in defense of LEDs in jars, I happen to have 12 of those on the deck of my apartment. A couple slowly pulsing in and out.) So for your enjoyment, here is a quick, easy, and inexpensive guide to making a high powered solar lighting system. (If you like my project, vote for it in the Off The Grid Contest here at instructables, I'm the first entry. Seriously. A vote for me will bring you instant karma and a warm fuzzy feeling. WARNING: Warm fuzzy feeling may in fact be low levels of radiation. Seek medical help.) If you're looking to make a smaller solar project, check out our basic Solar USB 2.0 Kit or the more rugged Lithium Heavy Duty 2.0 Kit.
LED SolarLights Outdoor Waterproof
Find the Positive wire coming off your solar panel. Hook it up to the positive leg of your diode. Then put the Negative leg of the diode (it's the one with the black or silver bar on it) into the Positive input of your charge controller.
It's important that you label which leg is which. Seriously. If you don't, you'll end up like my FIRST attempt at this circuit. The one where my transistor sparked and split in two.
In the picture above I'm using the driver on the left. It can handle 10 Watts of output. The one on the right you can use to power a single 1 Watt LED. As you can probably guess the one on the left is more expensive. I choose to get this more expensive driver for it's added features, and you can easily make things cheaper by going with a more "standard" driver.
Find the Base leg. Put the resistor next to it, and solder the resistor into place. Now connect one leg of the resistor to the Base leg.
Solar LEDLights Outdoor
One thing to keep in mind is that these LEDs need a "driver." This is a circuit designed to regulate current so you don't blow out your LED. Plus you can use any LED color type without having to switch out resistors. Quite handy. When buying a LED Driver make sure you're getting one with the same power rating as the LED you want to use. My driver can handle up to 10 Watts, which is perfect for running two 3 watt LEDs off of 12V. (Or so says the instruction PDF file.)
That's it. Turn the solar panel face down and see if the LEDs turn on. Mine did. You can change how "sensitive" this circuit is by changing the value of the resistor in the circuit.
(Make sure you thread it in the EXACT same way as the original wire. While this may not always be possible, it is the most simple solution. Otherwise drill a hole in the side and later seal it up with some calk.)
Take the Positive wire from one of your LEDs and hook it into the LED Driver + Out Clamp. (If you don't know which is positive and which is negative, grab a multimeter and do a quick test.)
(I honestly just wedged it in there. No need for extra adhesive or parts. If you do try and use something, make sure it's heat resistant.)
(Plus if you're really feeling adventurous, you can hook up a micro controller to the LED Driver to do some crazy effects. Oh yes. Arduino power your LED lighting system. Which I might do. Just because I can. Have it pulse in and out or do strobes at a certain time...)
***Before you do ANYTHING you should locate information about what each leg of your transistor does what. You have a Base, Emitter, and a Collector. Know which one is which. Usually it's on the packaging, otherwise google it.***
Solar LEDStrip Lights Waterproof
If you're worried about water coming in the top, get some rubber and line the inside of the lid. A cheap and easy O-Ring also works. You could also add a line of caulk as well for similar protection. If you want to make things very easy for yourself, find a food container that already has an O-Ring built in, though they can get expensive at the size we're using.
Once the hole was the right size for the clamp I twisted it into place. I also added in a rubber washer to help protect against water. Once everything was in place, I used some silicon caulk to further water protect it all. (Yes, when you run wires through there will still be open space. Try running the wires through a couple of rubber washer, and use those to seal up the holes. That and more caulk if you want things to be super permanent.)
Solar LEDRope lights
Check out our Light Up Christmas Hats page to find the trendiest glow toys. We have a huge selection of blinkee lights, flashy accessories, and party favors ...
Solar LEDBulb
I then connected the Positive and Negative tabs on my battery to the B+ and B- terminals on the Charge Controller. As my charge controller uses screw clamps, this was easy.
Now get your wire. We want to connect one wire to the free end of the resistor, to the Collector leg, and to the Emitter leg.
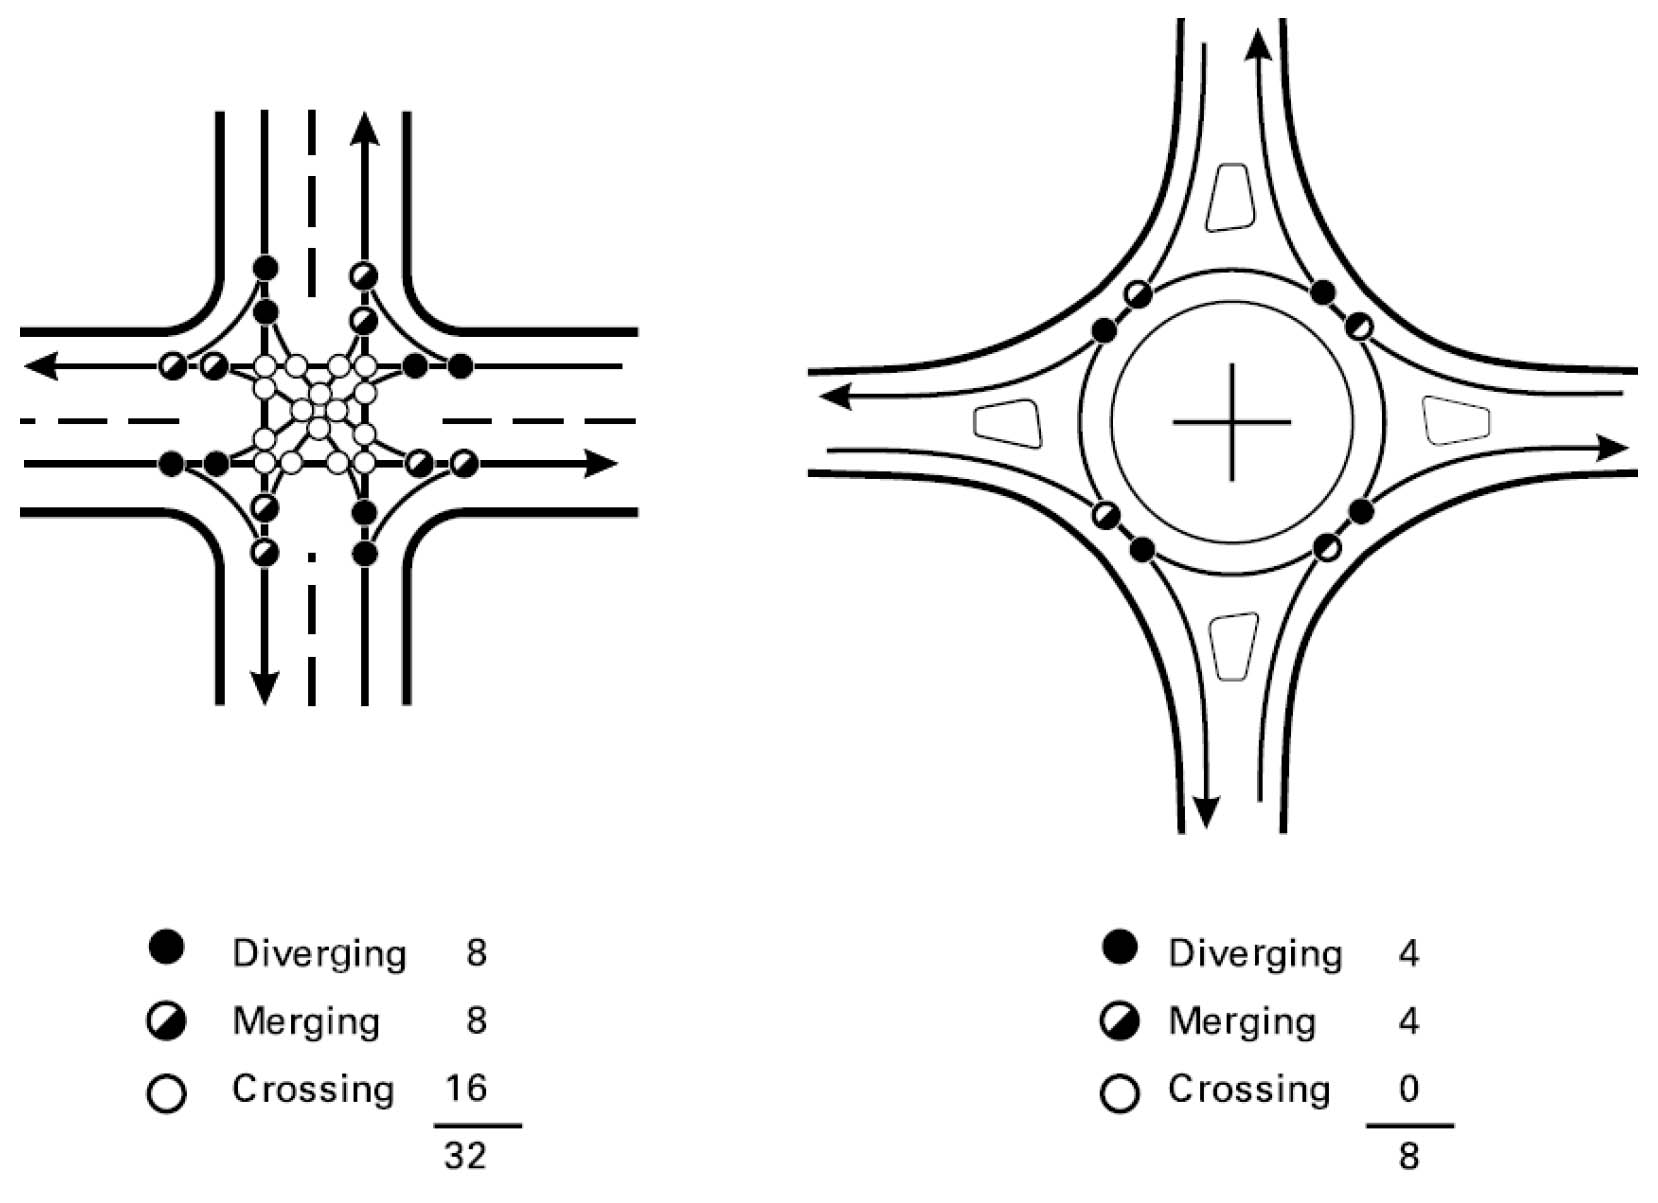
A single-lane roundabout only has eight "points of conflict" where a crash could occur. Typical intersections have 32. Click on the image at right to enlarge.
Then I took some more wire and hooked it up to the L+ and L- on the charge controller. These are the "Load" terminals that supply power to whatever it is you're trying to run.
Outfit your vehicle with the Driver Pro 9R and join the street legal lighting revolution! *Always check with regional rules and regulations regarding the ...
Another option would be to use a Microcontroller (such as an Arduino) to control the LED Driver. The driver I have has a PWM port. It would be easy to wire an Arduino into the setup to act as the darkness detector. Though to be honest that is a bit of an overkill for this project. You could also then power the Arduino via the 12V battery, and in my case I could use the built in USB ports on the charge controller. (I may in the future, but thats a different guide all together.)
Solar LEDLantern
CAUTION Restricted Area Radiation Hazard Sign ; SKU: 3369-LABEL ; TRAVIS M. · Verified Customer ; Recommend this Company. 5 / 5 ; Would Buy Again. 5 / 5. Share.
I also took one of my extra heat sinks and put it on the back of the transistor. While it probably isn't necessary, I might as well.
To make the hole in the side of the tub I chose to use an old soldering iron and melt a hole. Using a drill will work for some people if their enclosure can handle it. I have bad luck with drilling plastic and I don't want any cracks.
So many of you are probably wondering why I've not talked about darkness detecting. Meaning the fact that this system is just always "on", which is a waste of power and very very annoying.
To be honest, we're pretty much just hacking a cheap lighting system into a solar lighting system. Most of the parts we will need come preassembled. We're mostly just wiring things up. The nice part about that is the fact that we only have to do a little soldering.
All roundabouts are designed with an "apron" around the center island that is flush or nearly so with the driving surface.
Solar LEDLight Strip outdoor
Using a roundabout is easy! Traffic flows continuously and always to the right. Just remember to choose your lane before you approach the circle - just like you would in a conventional intersection. Learn More ».
Roundabouts are also good for pedestrians and the environment. The lower speeds and center islands make it easier to cross the street. And with no cars idling at red lights, the continuous flow of traffic means less gas wasted and less pollution.
Making Rhode Island's roads safer is one of our primary missions. Of particular concern is safety at intersections, where 7,000 people are killed and nearly 1 million people are injured in intersection-related crashes across the country. Using modern roundabouts in place of traditional intersections is a safer solution we're looking to employ wherever we can.
I took a plain plastic tub and modified it a bit using a cable clamp. More or less a big screw in system that latches onto wires to hold them in place. I got this from a local hardware store, and they had several types.
You could also modify this design and use it for lights inside your home or on your deck. Same idea, but add a switch into the mix.
Cars don't drive in this area, but trucks can, allowing the largest tractor trailers, fire trucks, campers and other large vehicles to easily navigate through the circle.
A roundabout is a one-way, circular intersection built with no traffic signal equipment. Traffic flows around a center island, with those entering the circle yielding to traffic already in the roundabout. Get more information on how to use a roundabout.
Take the Base wire from the Dark Detecting Circuit (it's the one with the resistor if you did things correctly) and attach it to the diode at the same point where you attached the solar cell's Positive wire. Or in other words, BEFORE the diode.
High powered LEDs are not like your regular LEDs. They use a lot of current and put out a lot of heat. They are, however, quite cheap. I bought mine on eBay for a few dollars. I went with 3 Watt LEDs because... well... I like the power. Most people would be happy with some 1 Watt LEDs.
Then remove the various electronics on the inside. In this case it's just the connector that would hook up the regular light bulb.
Well now that you know how everything hooks together, it's time to wire up the box. (Which means you're going to have to unscrew all your wires. But don't complain, it's an easy task!)
SolarPoweredLEDlights Indoor
... blue beacon lights for your application ... 24" Low Profile LED ...
Parts:1N4001 Diode (or something similar) TIP42 Transistor (or any similar PNP transistor) 10,000Ohm ResistorA Prototyping Board Wire (If you have an extra heat sink, use it.)
More or less we're using a system similar to how regular small garden lights work, and all for the cost of a PNP transistor and a resistor.
I cut some wire and attached it to a terminal connector for use with my battery. You may wish to do the same, or just use some alligator clips.
If you're an overachiever you may wish to go to my "final final" step and make yourself a dark detecting circuit. It only takes a couple of minutes and makes you seem all the more awesome to the neighbors.
What we're doing is using the transistor as a "gateway". When the transistor is getting power from the solar cell (meaning day time) the "gate" is closed. At night time when there is no power coming from the solar panel, the "gate" opens and power goes to the LEDs.
You'll be seeing stars at Night Rider! Come and ride under the lights from 6pm – 9pm on Thursday Nights. Every Thursday throughout our summer season (3rd ...
The drip trays are made from materials such as stainless steel and recycled plastic. View products Read more. Drip trays. Order directly. Excited about our ...
All we're doing is soldering on the transistor, resistor, and 3 wires to the prototyping board. The diode we use in conjunction with the solar panel later on.
Name: Square shape 16 LED Fog Light For Omni Headlight, Fog Lamp Car, Motorbike, Truck, Van LED for Maruti Suzuki (12 V, 48 W) (Omni, Pack of 2) Net ...


 13322766566